``` above, using the map id of the element as a selector.
```jsx
import Map from 'ol/Map.js';
const map = new Map({target: 'map'});
```
API Doc: [ol/Map](https://openlayers.org/en/latest/apidoc/module-ol_Map-Map.html "ol/Map")
**View**
The ```view``` in OpenLayers determines the ```center```, ```zoom``` and ```projection``` of the map. It acts as the window through which users observe the geographic data. you can configure different views to represent varying perspectives or zoom levels within a single map.
```jsx
import View from 'ol/View.js';
map.setView(new View({
center: [0, 0],
zoom: 2,
}));
```
The projection determines the coordinate system of the center and the units for map resolution calculations. If not specified (like in the above snippet), the default projection is Spherical Mercator (EPSG:3857), with meters as map units.
The available zoom levels are determined by ```maxZoom``` (default: 28), ```zoomFactor``` (default: 2) and ```maxResolutio```n (default is calculated in such a way that the projection's validity extent fits in a 256x256 pixel tile).
API Doc: [ol/View](https://openlayers.org/en/latest/apidoc/module-ol_View-View.html "ol/View")
**Source**
Sources provide the data for layers. OpenLayers supports different sources, including Tile sources for raster data, Vector sources for vector data, and Image sources for static images. These sources can fetch data from various providers or be customized to handle specific data formats.
To get remote data for a layer you can use the ```ol/source``` subclasses.
```jsx
import OSM from 'ol/source/OSM.js';
const source = OSM();
```
API Doc: [ol/source](https://openlayers.org/en/latest/apidoc/module-ol_source.html "ol/source").
**Layer**
Layers define the visual content of the map. OpenLayers supports various layer types, such as Tile layers for raster data, Vector layers for vector data, and Image layers for rendering images. Layers can be stacked to combine different types of information into a single, coherent map.
- ```ol/layer/Tile``` - Renders sources that provide tiled images in grids that are organized by zoom levels for specific resolutions.
- ```ol/layer/Image``` - Renders sources that provide map images at arbitrary extents and resolutions.
- ```ol/layer/Vector``` - Renders vector data client-side.
- ```ol/layer/VectorTile``` - Renders data that is provided as vector tiles.
```jsx
import TileLayer from 'ol/layer/Tile.js';
// ...
const layer = new TileLayer({source: source});
map.addLayer(layer);
```
API Doc: [ol/slayer](https://openlayers.org/en/latest/apidoc/module-ol_layer_Layer-Layer.html "ol/layer").
## Installing OpenLayers
To start your journey into the world of interactive maps with OpenLayers and React, the first step is to install OpenLayers using your preferred package manager – npm or yarn. Open a terminal and execute one of the following commands:
```shell
npm install ol
# or
yarn add ol
```
This command fetches the latest version of OpenLayers and installs it as a dependency in your project. With the library now available, you're ready to embark on the next steps of integrating OpenLayers with React.
## Setting Up a Basic React Component for the Map
Now that OpenLayers is part of your project, the next crucial step is to create a React component that will serve as the container for your interactive map.
If you try to render the Map before the component has been mounted (meaning outside of useEffect) like following you will get an error message.
```jsx
const MapComponent = () => {
// Incorrect: Rendering content before the component has mounted
const map = new Map({
target: 'map', // The ID of the div element where the map will be rendered
...
}
return
;
};
```
**Solution:**
Ensure that you only render content when the component has properly mounted. You can use lifecycle methods like ```componentDidMount``` in class components or ```useEffect``` in functional components.
```jsx
const MapComponent = () => {
useEffect(() => {
// Code here runs after the component has mounted
const map = new Map({
target: 'map', // The ID of the div element where the map will be rendered
...
}
return () => map.setTarget(null)
}, []);
return
;
};
```
The return function will reponsible for resource cleanup for the map.
So a basic OpenLayers React example could look like the following:
```jsx// MapComponent.js
// MapComponent.js
import React, { useState, useEffect, useRef } from 'react';
import { Map, View } from 'ol';
import TileLayer from 'ol/layer/Tile';
import OSM from 'ol/source/OSM';
import 'ol/ol.css';
function MapComponent() {
useEffect(() => {
const osmLayer = new TileLayer({
preload: Infinity,
source: new OSM(),
})
const map = new Map({
target: "map",
layers: [osmLayer],
view: new View({
center: [0, 0],
zoom: 0,
}),
});
return () => map.setTarget(null)
}, []);
return (
);
}
export default MapComponent;
```
In this example, the ```MapComponent``` initializes an OpenLayers map with a simple OpenStreetMap layer and the ```useEffect``` hook ensures that the map is created when the component mounts.
To ensure the correct styling and functionality of OpenLayers, it's crucial to import the necessary CSS and modules. In the ```MapComponent.js``` file, notice the import statement for the OpenLayers CSS:
```jsx
import 'ol/ol.css'; // Import OpenLayers CSS
```
This line imports the essential stylesheets required for OpenLayers to render properly.
Additionally, other modules from OpenLayers, such as Map, View, TileLayer, and OSM, are imported to create the map instance and layers.
By following these steps, you've successfully set up a basic React component housing an OpenLayers map. You're now ready to delve deeper into the capabilities of OpenLayers and explore advanced features for creating dynamic and interactive maps within your React applications.
Also I created two examples for React and Openlayers:
- [OpenLayers 6 React example using a functional component](https://github.com/dietrichmax/openlayers-react-functional-component "OpenLayers 6 React example using a functional component")
- [OpenLayers 6 React example using a class component](https://github.com/dietrichmax/openlayers-react-class-component "OpenLayers 6 React example using a class component")
## Markers, Popups, and Custom Overlays
Markers, popups, and custom overlays enhance the visual storytelling capabilities of a map, providing users with valuable context. OpenLayers simplifies the process of adding these elements:
- **Markers:** Representing specific points of interest on a map becomes intuitive with markers. you can add markers to highlight locations, making the map more informative and engaging.
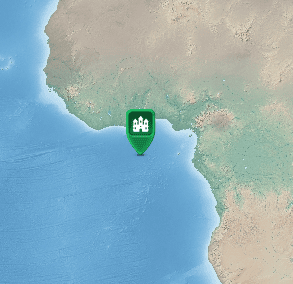
- **Popups:** Interactive popups can be attached to markers, providing additional information when users click on specific map features. This allows for a more detailed exploration of the data.
- **Custom Overlays**: OpenLayers allows you to create custom overlays, enabling the display of additional information in a tailored manner. This could include tooltips, legends, or any other supplementary elements.
Here's a simplified example demonstrating the addition of a marker with a popup:
```jsx
// MarkerPopupMap.js
import React, { useEffect } from "react"
import Point from 'ol/geom/Point.js';
import "ol/ol.css"
import Map from "ol/Map"
import View from "ol/View"
import {OGCMapTile, Vector as VectorSource} from 'ol/source.js';
import {Tile as TileLayer, Vector as VectorLayer} from 'ol/layer.js';
import Overlay from "ol/Overlay"
import {toLonLat} from 'ol/proj.js';
import {toStringHDMS} from 'ol/coordinate.js';
import Feature from 'ol/Feature.js';
const MarkerPopupMap = () => {
useEffect(() => {
const iconFeature = new Feature({
geometry: new Point([0, 0]),
name: 'Null Island',
population: 4000,
rainfall: 500,
});
const vectorSource = new VectorSource({
features: [iconFeature],
});
const vectorLayer = new VectorLayer({
source: vectorSource,
});
const rasterLayer = new TileLayer({
source: new OGCMapTile({
url: 'https://maps.gnosis.earth/ogcapi/collections/NaturalEarth:raster:HYP_HR_SR_OB_DR/map/tiles/WebMercatorQuad',
crossOrigin: '',
}),
});
const container = document.getElementById('popup');
const content = document.getElementById('popup-content');
const closer = document.getElementById('popup-closer');
const overlay = new Overlay({
element: container,
autoPan: {
animation: {
duration: 250,
},
},
});
const map = new Map({
layers: [rasterLayer, vectorLayer],
target: "markerpopupmap",
view: new View({
center: [0, 0],
zoom: 3,
}),
overlays: [overlay],
});
/**
* Add a click handler to the map to render the popup.
*/
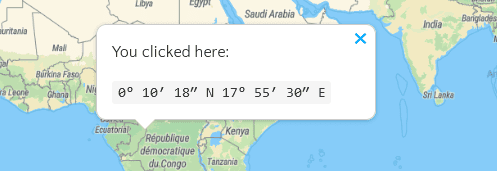
map.on('singleclick', function (evt) {
const coordinate = evt.coordinate;
const hdms = toStringHDMS(toLonLat(coordinate));
content.innerHTML = '
You clicked here:
' + hdms + '';
overlay.setPosition(coordinate);
});
return () => map.setTarget(null)
}, [])
return (
)
}
export default MarkerPopupMap
```
## Handling Map Events and User Interactions:
Interactive maps come to life when you handle events and user interactions effectively. OpenLayers simplifies this process by providing robust event handling mechanisms. Consider the following example demonstrating how to capture a click event on the map:
```jsx
// Handle a click event on the map
map.on('click', (event) => {
const clickedCoordinate = event.coordinate;
console.log('Clicked Coordinate:', clickedCoordinate);
});
```
This example displays OpenLayers' event handling to log the coordinates of a click event on the map. you can extend this functionality to respond to various user interactions, such as dragging, zooming, or even custom gestures.
**useState for Managing State:** Use the useState hook to manage state within the React component. This is particularly useful for dynamic changes to the map, such as updating the center or zoom level based on user interactions.
```jsx
const [mapCenter, setMapCenter] = useState([0, 0]);
// Update the map's center based on user interaction
const handleMapInteraction = (event) => {
const newCenter = event.map.getView().getCenter();
setMapCenter(newCenter);
};
```
## Advanced OpenLayers Map Features
**Adding Vector Layers and Working with GeoJSON Data**
Vector layers in OpenLayers allow you to display and interact with vector data, opening up possibilities for intricate and detailed map representations. Leveraging GeoJSON, a popular format for encoding geographic data, is a common practice. Below is an example of incorporating a vector layer with GeoJSON data into a React component:
```jsx
// VectorLayerMap.js
import React, { useEffect } from 'react';
import 'ol/ol.css';
import Map from 'ol/Map';
import View from 'ol/View';
import TileLayer from 'ol/layer/Tile';
import OSM from 'ol/source/OSM';
import VectorLayer from 'ol/layer/Vector';
import VectorSource from 'ol/source/Vector';
import GeoJSON from 'ol/format/GeoJSON';
const VectorLayerMap = () => {
useEffect(() => {
const vectorSource = new VectorSource({
features: new GeoJSON().readFeatures(geojsonObject),
});
const vectorLayer = new VectorLayer({
source: vectorSource,
});
const map = new Map({
target: 'vectorLayerMap',
layers: [
new TileLayer({
source: new OSM(),
}),
vectorLayer,
],
view: new View({
center: [0, 0],
zoom: 2,
}),
});
return () => map.setTarget(null)
}, []);
return
;
};
export default VectorLayerMap;
const geojsonObject =
{
'type': 'Feature',
'geometry': {
'type': 'MultiLineString',
'coordinates': [
[
[-1e6, -7.5e5],
[-1e6, 7.5e5],
],
[
[1e6, -7.5e5],
[1e6, 7.5e5],
],
[
[-7.5e5, -1e6],
[7.5e5, -1e6],
],
[
[-7.5e5, 1e6],
[7.5e5, 1e6],
],
],
}
}
```
## Optimizing React and OpenLayers Integration: Strategies for Rendering Performance
**1. Addressing Rendering Performance Concerns:**
Efficient rendering is paramount in any web application, and integrating OpenLayers with React requires careful consideration of performance concerns. Here are some strategies to address rendering performance:
- **Debouncing and Throttling:** When handling events that trigger frequent updates, such as map movements or zoom changes, implement debouncing or throttling techniques. This prevents excessive re-renders and ensures that updates are processed at a controlled rate.
- **Batched State Updates:** Use React's `setState` batching mechanism to group multiple state updates into a single render cycle. This reduces the number of renders triggered by multiple state changes, resulting in a more efficient rendering process.
**2. Implementing Lazy Loading for Map Components:**
To enhance overall application performance, especially in scenarios where maps are not initially visible or are part of larger applications, consider implementing lazy loading for map components. This ensures that the OpenLayers library and associated map components are only loaded when needed.
- **Dynamic Imports:** Use dynamic imports and React's `React.lazy` to load OpenLayers and map components lazily. This approach allows you to split your code into smaller chunks that are loaded on-demand, reducing the initial page load time.
```jsx
// Example using React.lazy
const LazyLoadedMap = React.lazy(() => import('./LazyLoadedMap'));
const App = () => (
{/* Other components */}
Loading...
}>